Woodworker's Journal 2004 Summer, страница 57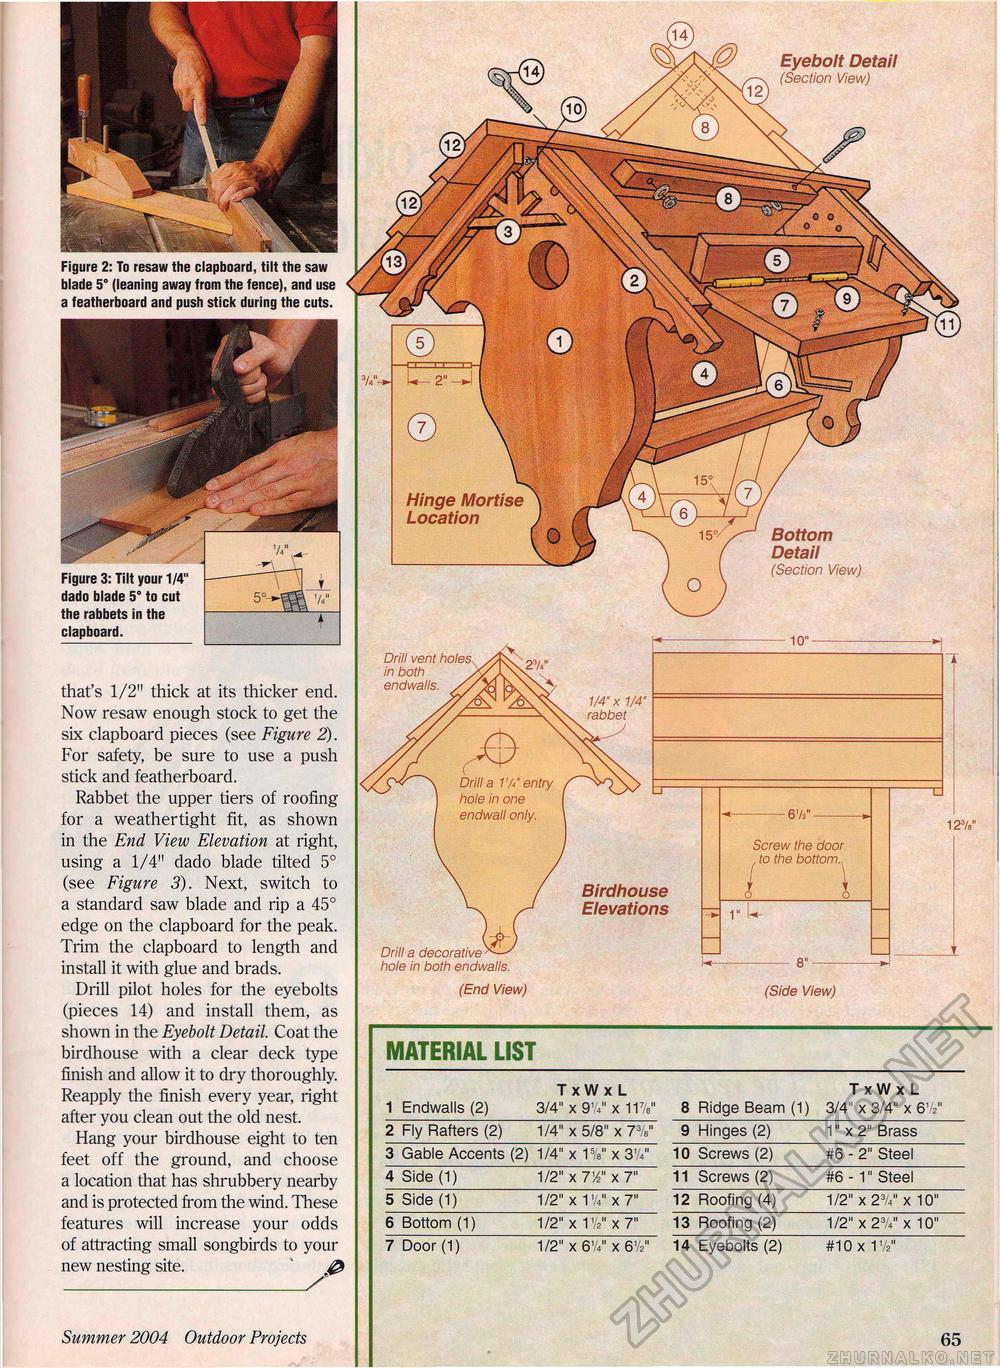
Summer 2004 Outdoor Projects 57 Eyebolt Detail (Section View) Figure 2: To resaw the clapboard, tilt the saw blade 5° (leaning away from the fence), and use a featherboard and push stick during the cuts. MATERIAL LIST TxWxL TxWxL 1 Endwalls (2) 3/4" x 9V x 11V 8 Ridge Beam (1) 3/4" x 3/4" x &k" 2 Fly Rafters (2) 1/4" x 5/8" x 77s" 9 Hinges (2) 1" x 2" Brass 3 Gable Accents (2) 1/4" x 1%" x 3V 10 Screws (2) #6 - 2" Steel 4 Side (1) 1/2" x 7W x 7" 11 Screws (2) #6-1" Steel 5 Side (1) 1/2" x 1'/.)" x 7" 12 Roofing (4) 1/2" x 27.." x 10" 6 Bottom (1) 1/2" x 1V x 7" 13 Roofing (2) 1/2" x 2-3A° x 10" 7 Door (1) 1/2" x 61A" x 6V2" 14 Eyebolts (2) #10 x 17?" that's 1/2" thick at its thicker end. Now resaw enough stock to get the six clapboard pieces (see Figure 2). For safety, be sure to use a push stick and featherboard. Rabbet the upper tiers of roofing for a weathertight fit, as shown in the End View Elevation at right, using a 1/4" dado blade tilted 5° (see Figure 3). Next, switch to a standard saw blade and rip a 45° edge on the clapboard for the peak. Trim the clapboard to length and install it with glue and brads. Drill pilot holes for the eyebolts (pieces 14) and install them, as shown in the Eyebolt Detail. Coat the birdhouse with a clear deck type finish and allow it to dry thoroughly. Reapply the finish every year, right after you clean out the old nest. Hang your birdhouse eight to ten feet off the ground, and choose a location that has shrubbery nearby and is protected from the wind. These features will increase your odds of attracting small songbirds to your new nesting site. " jfr 1/4'x 1/4' rabbet Birdhouse Elevations 67*" --- Screw the door to the bottom. (Side View) Figure 3: Tilt your 1/4" dado blade 5° to cut the rabbets in the clapboard. Hinge Mortise Location Drill vent in both endwalls. (End View) Drill a decorative hole in both endwalls. Bottom Detail (Section View) |


